Use file form element or email activity file attachments
Goal
In this how-to, we'll go through the necessary steps in order to complete the following goals
- Learn how a file element can be used in another form.
- Learn how a uploaded file can be exported to another system/location
- Learn how an already uploaded file can be used to be sent as an attachment
Scenario 1 - File upload
Let end-user upload a file attachment and include it in a task activity.
Create Service
Create a service called File Upload, add a file element and then create a task which will contain the same form as order form, but readonly.
- Go to AdminWeb > Services > Add Service > New blank process > Enter Identifier/Name > Create
- Form editor > Drag-and-drop a File upload element
- Edit the item and bind it to a variable called "uploadedFile"
- Copy selected form, name it TaskForm and make the File field readonly.
- Go to Workflow editor and add a Task Activity.
- Edit the task activity and set the form to TaskForm.
- Assign the task to System.Requester.Email
- Click Save and Publish > View pulished service
Tip
We assign to System.Requester.Email to assign the task to the account placing the order, this is commonly used for testing purposes.
Place test order
- Place a test order and upload a document file in the Order form.
- A task should soon be created.
- In the task form the same uploaded file is available in a read-only field.
Example
Scenario 2 - Email file attachment
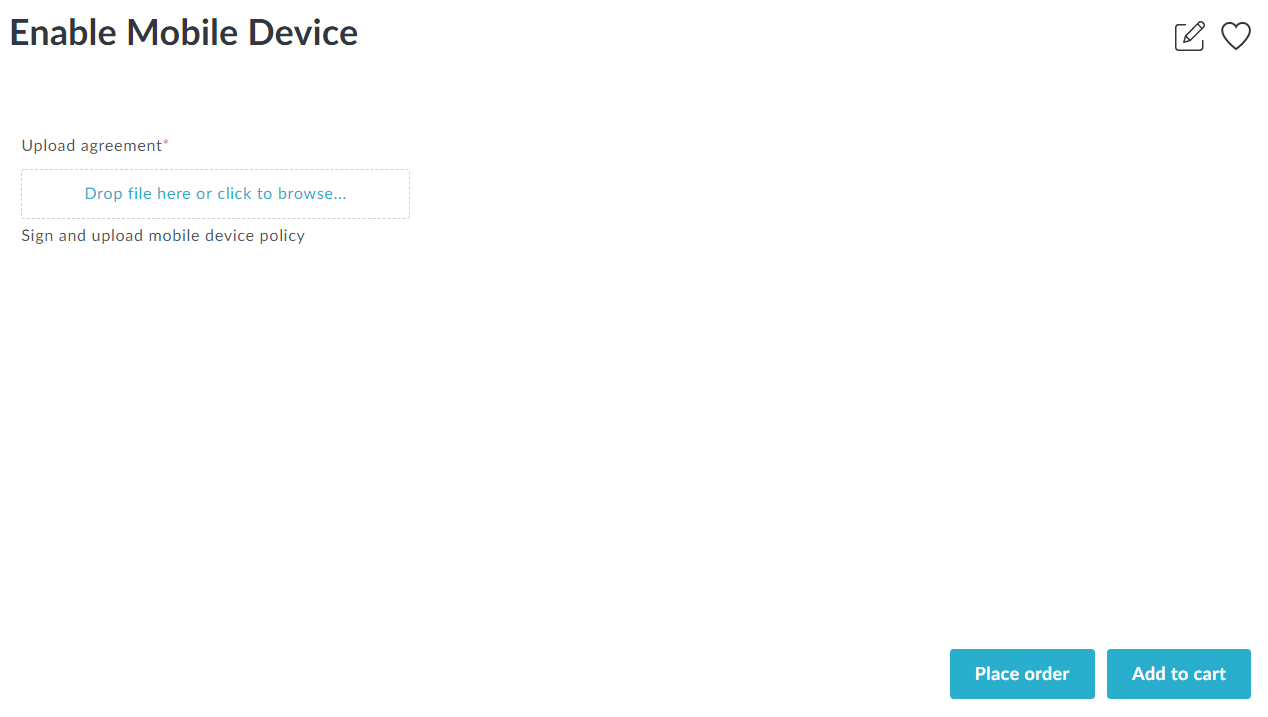
As part of a mobile device activation service, we want the requester to include a signed agreement, this signed agreement should also be stored on a file share. After the agreement is stored the end-user should receive a mobile device manual PDF sent to her email.
Before you begin
- Ensure you have access to the ProvisioningSystem server
- Ensure you have access to Zervicepoint Management API access
- Service Account running ProvisioningSystem must have access to ApiStoreAdministrator role
- Email Configured
- Example txt/pdf file to upload.
Create Order Form
We start of by creating a simple Order Form that could look like the following:
Example
- Go to AdminWeb > Services > Add Service > New blank process > Enter Identifier/Name > Create
- Form editor > Drag-and-drop a File upload element
- Edit the item and bind it to a variable called "uploadedFile"
- Copy selected form, name it ApprovalForm and make the File field readonly.
- Go to Workflow editor and add a Approval Activity.
- Edit the approval activity and set the form to ApprovalForm.
- Assign the approval to Users Manager
- Add a End workflow activity on a On reject approval event.
- Click Save and Publish > View pulished service
Note
If the requester does not have any manager, it will be automatically approved.
Now that we've created a form and added a approval, we want to be able to export the uploaded file from zervicepoint and store it on a local file share. To do this we must create a custom activity which should retrieve the file using Zervicepoint Management API and then export it.
Create Activity to export file
We'll create our own provider called "ZPDocsMedia" and add a function called Export-MobileDeviceAgreement
On the provisioning server, run PowerShell (as admin) and create a provider.xml, powershell module and add the Export-MobileDeviceAgreement function.
Create PowerShell Module Manifest
New-ModuleManifest -Path C:\Plugin\ZPDocsMedia\Activities\Activity.ZPDocsMedia\Activity.ZPDocsMedia.psd1 `
-RootModule "Activity.ZPDocsMedia.psm1" `
-FileList @("Activity.ZPDocsMedia.psd1","Activity.ZPDocsMedia.psm1") `
-FunctionsToExport @('*') `
-PowerShellVersion 3.0
Write function to PowerShell Module
Copy the function and insert it into the .psm1 file
$psm1 = @'
function Export-MobileDeviceAgreement {
    param(
        [Parameter(Mandatory=$true)]
        [string]$UniqueId,

        [Parameter(Mandatory=$true)]
        [int]$OrderId
    )

    # The account running ProvisioningSystem service must be able to retrieve a security token for API access
    Get-ZPSecurityToken | Set-ZPSecurityToken

    # We retrieve the media using Get-ZPMedia, the parameter for UniqueId must include the variable bound to the file upload field
    $getZPMedia = Get-ZPMedia -UniqueId $UniqueId

    # In this example, we export the file to a local location called FileShare and we format the name to be OrderId_UniqueId_FileName
    # 1000_f696d3ed-7afc-4be1-9c80-30df37a67ea4_agreement.pdf
    $filePath = "C:\FileShare\$($OrderId)_$($getZPMedia.UniqueId)_$($getZPMedia.Name)"

    # If we can retrieve the media, we check if the file has already been exported. (This could be the case if someone restart the order)
    # Else, we attempt to export the file by using the content property (bytearray) from Get-ZPMedia, and use Set-Content cmdlet to write it to $filePath.
    # If an error occurs when we attempt to export the file, we give a different State/StatusCode.
    if ($getZPMedia) {
        if (Test-Path -Path $filePath) {
            $ht = @{
                State = "Agreement already exists"
                StatusCode = 1
            }
        } else {
            try {
                $getZPMedia.Content | Set-Content -Encoding Byte -Path $filePath -ErrorAction Stop
                $ht = @{
                    State = "Successfully exported agreement"
                    StatusCode = 0
                }
            } catch {
                $ht = @{
                    State = "Failed to export agreement"
                    StatusCode = 2
                }
            }
        }
        # Return the hashtable created in one of the cases above.
        $ht
    }
}
'@

$psm1 | Out-File 'C:\Plugin\ZPDocsMedia\Activities\Activity.ZPDocsMedia\Activity.ZPDocsMedia.psm1' -Encoding UTF8
Create a plugin xml
The provisioningsystem provider xml contain metadata for the plugin, name, scriptpath. It is also possible to extend this file with custom keys that can contain configuration related to the plugin. URLs etc
Copy and paste the following code in a powershell prompt to create a plugin XML file.
$pluginxml = @'
<?xml version="1.0" encoding="utf-8"?>
<providers>
<provider name="ZPDocsMedia">
    <assembly type="Zipper.ZervicePoint.ProvisioningSystem.PowerShellProvider.PowerShellEngine" assemblyFile="C:\Program Files\Zipper\ZervicePoint\ProvisioningSystem\Providers\PowerShell\Zipper.ZervicePoint.ProvisioningSystem.PowerShellProvider.dll" />
    <configuration>
    <add key="scriptpath" value="C:\Plugin\ZPDocsMedia\Activities\" />
    </configuration>
</provider>
</providers>
'@

$pluginxml | Out-File 'C:\Program Files\Zipper\ZervicePoint\ProvisioningSystem\ZPDocsMedia.provisioningsystem.providers.xml' -Encoding UTF8
Trigger Inventory
To inventory new activties, you can choose one of the following methods.
Restart-Service -Name ProvisioningSystem

# or

& 'C:\Program Files\Zipper\ZervicePoint\ProvisioningSystem\Zipper.ZervicePoint.ProvisioningSystem.Service.exe' /inventoryonly
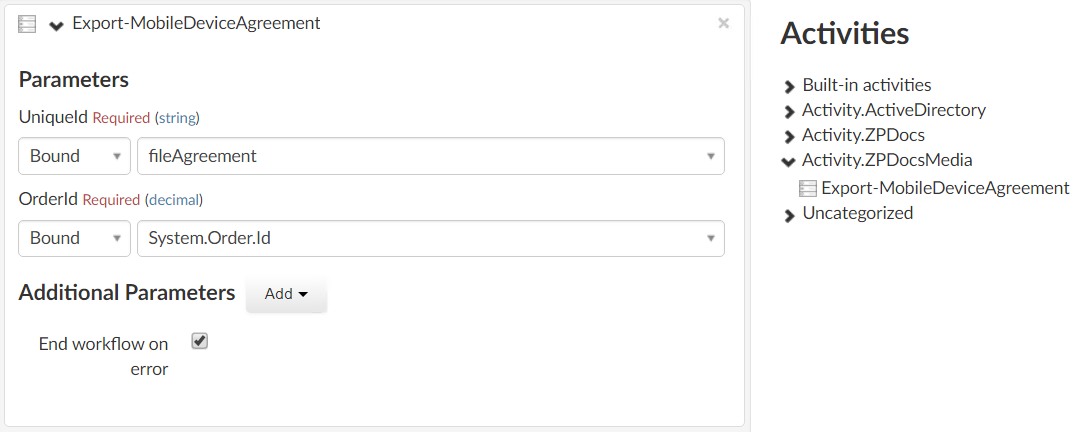
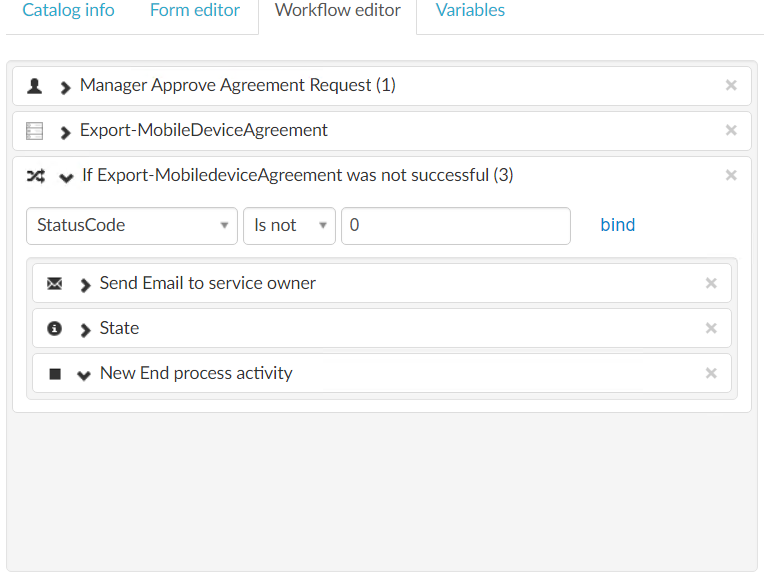
Example - Export-MobileDeviceAgreement shown in workflow editor
Update workflow to export agreement
Now that we've created the activity we need for our workflow, lets continue with the workflow by adding the step to exporting the agreement, and as well add some error handling in the event an error occurs.
This is a flowchart of our workflow.
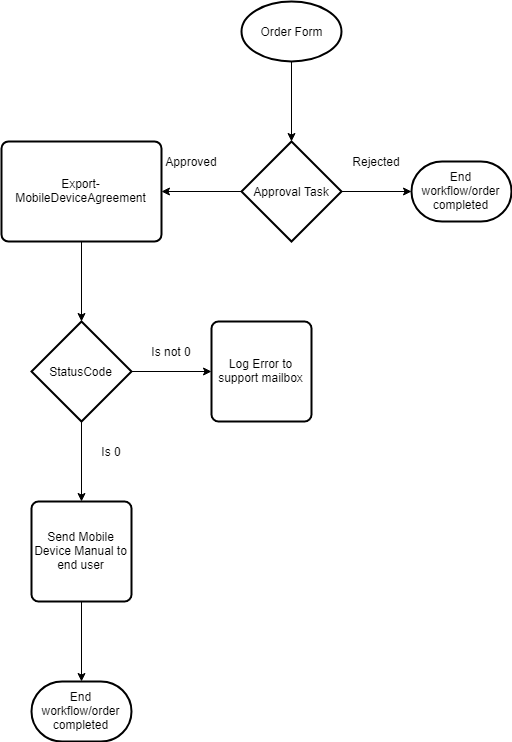
- In Workflow Editor, add the activity Export-MobileDeviceAgreement after the approval activity.
- Bind the parameter UniqueId to the variable bound to the file form element.
- Bind the parameter OrderId to the system variable System.Order.Id.
- Create a string variable called State.
- Create a decimal variable called StatusCode.
- Add a Conditional Sequence and set StatusCode is not 0.
- Here you can choose to either send an email to a mailbox of your choice, or to notify the requester with a status update and then terminate the workflow by adding a End workflow activity.
Example of workflow
Update workflow Send manual to requester
As part of our workflow, we want to include an file attachment in an information email to the requester. As file attachment only supports uniqueids from files stored in zervicepoint, we must upload the manual using New-ZPMedia cmdlet, and then assign the uniqueid to a file variable.
Upload manual PDF to zervicepoint
-
Upload manual.pdf using New-ZPMedia cmdlet
Import-Module 'C:\Program Files\Zipper\ZervicePoint\Powershell\ZervicePoint.WebApi.PowerShell'
Get-ZPSecurityToken | Set-ZPSecurityToken
New-ZPMedia -Path C:\Temp\manual.pdf -PassThru

# output
# UniqueId                             Name       ContentType     Content
# --------                             ----       -----------     -------
# 5fd1e4cc-1253-4eca-b6ed-7822b09b4102 manual.pdf application/pdf {104, 101, 106, 104...}
Save the UniqueId as it will be used for the next step.
-
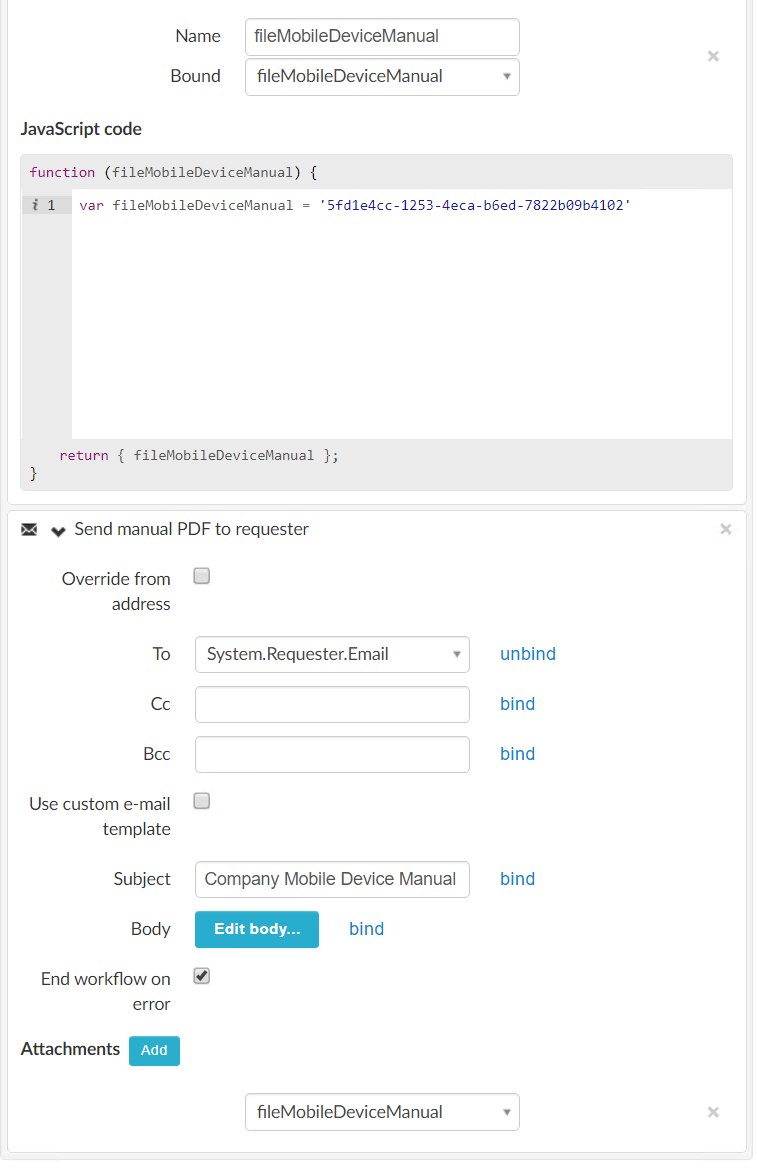
Add a code activity to assign a file variable.
Create a variable called fileMobileDeviceManual and then add a code activity with the parameter name fileMobileDeviceManual and variable bound to this as well.
Add
var fileMobileDeviceManual = '5fd1e4cc-1253-4eca-b6ed-7822b09b4102'in the JavaScript code block. -
Add a Send E-mail activity
Edit the email activity to mail to System.Requester.Email. Add a Subject/Body as you like.
Add an attachment and assign it to the variable called fileMobileDeviceManual
Example