Azure Login
Register Azure Application
To login with Azure AD we'll need to create a Azure Application in Azure. This can be done in either the azure web portal or by using their command line tools/APIs.
In this guide we'll go through the steps using the Azure CLI tool + web portal.
High-level steps:
- Create Azure Application
- Reply URLs
- Set API Permissions
- Update Application Manifest
- Azure API Key
- Multi-Tenant support on application
Install Microsoft Azure CLI
Login to Azure
az login
# az login --allow-no-subscriptions
# az account list
# az account set --subscription <subscription>
# Depending on your azure environment, you may need to make sure you work against the intended subscription where the azure application should be created.
Create Azure Application
# Note! Change the URL https://zervicepoint.example.com to the hostname for your zervicepoint site.

$createApp = az ad app create --display-name "zervicepoint" --homepage "https://zervicepoint.example.com" --identifier-uris "https://zervicepoint.example.com/" --reply-urls "https://zervicepoint.example.com/" "https://zervicepoint.example.com:20000/" | ConvertFrom-Json
Update manifest properties using Azure CLI
Tip
az ad app update --id $createApp.appId --set acceptMappedClaims=true
# NOTE! - There is currently a bug in az ad app update where it can't update this property, you must edit the manifest using the azure portal.
Update manifest properties using azure portal
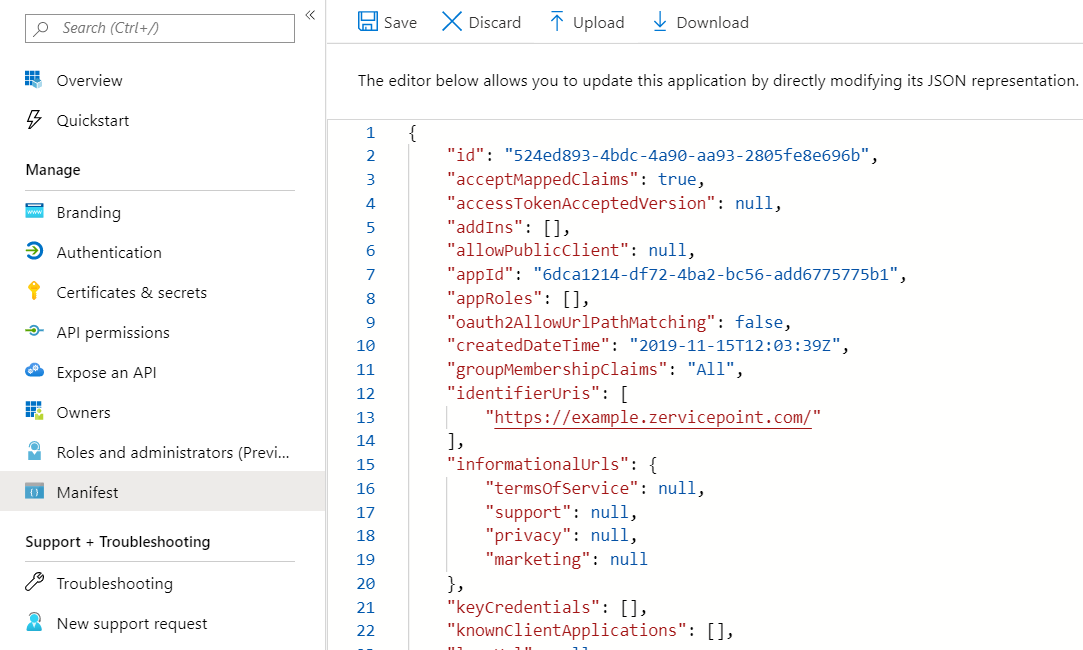
Azure Active Directory app manifest
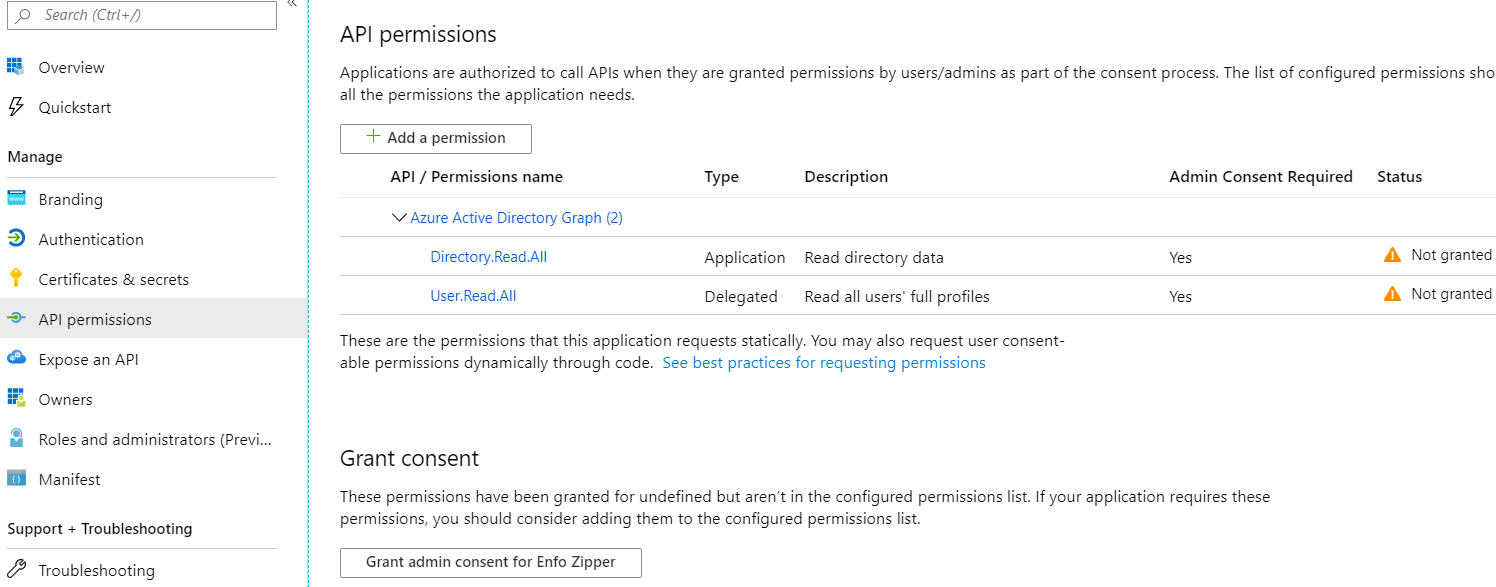
Update permissions
Add Azure Active Directory Graph/User.Read.All access (Delegated)
az ad app permission add --id $createApp.appId --api 00000002-0000-0000-c000-000000000000 --api-permissions c582532d-9d9e-43bd-a97c-2667a28ce295=Scope
Add Azure Active Directory Graph/Directory.Read.All access (Application)
az ad app permission add --id $createApp.appId --api 00000002-0000-0000-c000-000000000000 --api-permissions 5778995a-e1bf-45b8-affa-663a9f3f4d04=Role
You can also add and grant permissions using the azure web portal. Make sure you use the Api "Azure Active Directory Graph". After adding the permissions you should click the Grant consent button in order to grant consent for the permissions. If this step is not done then the first user to login to Zervicepoint, must be a global administrator or have the required permissions to register the application.
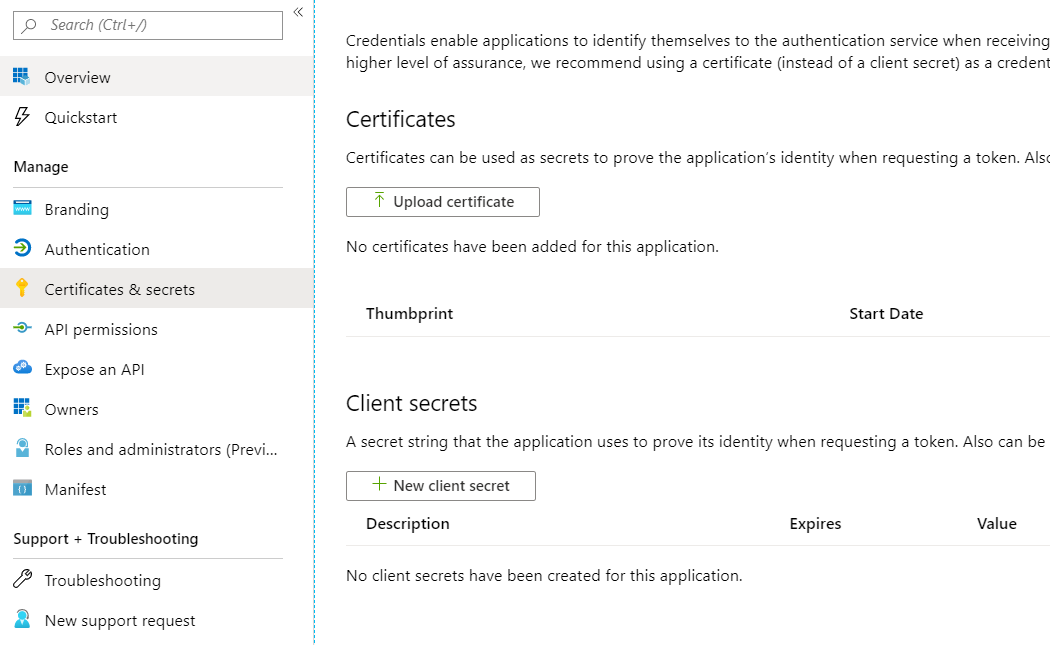
Create Azure App Secret
# if you don't have the $createApp.appId from step above, you can use
$createApp = az ad app list --display-name "zervicepoint" | ConvertFrom-Json
az ad app credential reset --id $createApp.appId --credential-description 'zervicepoint' --end-date '2030-01-01'
# output from command above
{
"appId": "<output is appid>",
"name": "<guid>",
"password": "<SAVE THIS PASSWORD>",
"tenant": "<your tenant id>"
}
The password that is created for the application should be stored in a Windows Credential called "AzureAppSecret" in the context of the service account running the IIS application pool.
You can also create this credential using the azure web portal.
Add AzureAppSecret to Application Pool service account
Important
This is only required once per Zervicepoint environment. Many stores may use the same credential. If you're hosting Zervicepoint for multiple stores, you could use the same application and other azure ad tenants will then trust this application.
Prerequisites
- Access to the central Zervicepoint server (the server hosting the UserWeb and AdminWeb
- The credentials for the service account that runs UserWeb and AdminWeb
- The Azure AD API key / or you need to be an administrator in your Azure AD and generate it.
Create Windows Credential
- Logon to the Zervicepoint server (the server hosting the UserWeb and AdminWeb) using the service account that runs UserWeb and AdminWeb. Alternatively, run powershell as this user.
start-process powershell -Credential (Get-Credential -UserName "domain\frontendaccount" -Message "Enter password for frontend account")

Import-Module "C:\Program Files\Zipper\ZervicePoint\Powershell\ZervicePoint.WebApi.PowerShell"
Set-ZPKeyCredential -Name "AzureAppSecret" -Key "<azure app secret>"
Optionally you can also create this credential using the Credential Manager in windows.
Adding claims to an Azure Application (optional)
When enabling Azure AD federation in Zervicepoint, the claims sent from Azure AD must incude the email address of the user logging on.
Important
This is only required once per Zervicepoint application in Azure. The serviceprincipal object is created when permissions have been granted to access resources in a tenant. You may need to login before adding optional claims to have the serviceprincipal object created.
Add claims using powershell eample
The following script will add the following claims:
- othermail
- country
Install-Module -Name AzureADPreview

$def = '{"ClaimsMappingPolicy":{"Version":1,"IncludeBasicClaimSet":"true", "ClaimsSchema": [{"Source":"user","ID":"othermail","SamlClaimType":"http://schemas.xmlsoap.org/ws/2005/05/identity/claims/othermail","JwtClaimType":"othermail"},{"Source":"user","ID":"mail","SamlClaimType":"http://schemas.xmlsoap.org/ws/2005/05/identity/claims/emailaddress","JwtClaimType":"email"},{"Source":"user","ID":"country","SamlClaimType":"http://schemas.xmlsoap.org/ws/2005/05/identity/claims/country","JwtClaimType":"country"}]}}'
$policy = New-AzureADPolicy -Definition $def -DisplayName "Zervicepoint Extra Claims” -Type "ClaimsMappingPolicy"

## You may need to change the displayname to filter for the name of your created application
$principal = Get-AzureADServicePrincipal -Filter "DisplayName eq 'Zervicepoint'"

Add-AzureADServicePrincipalPolicy -Id $principal.ObjectId -RefObjectId $policy.Id